How to connect a custom domain
With Framer, you can instantly publish your site to a Framer subdomain or a third-party custom domain.
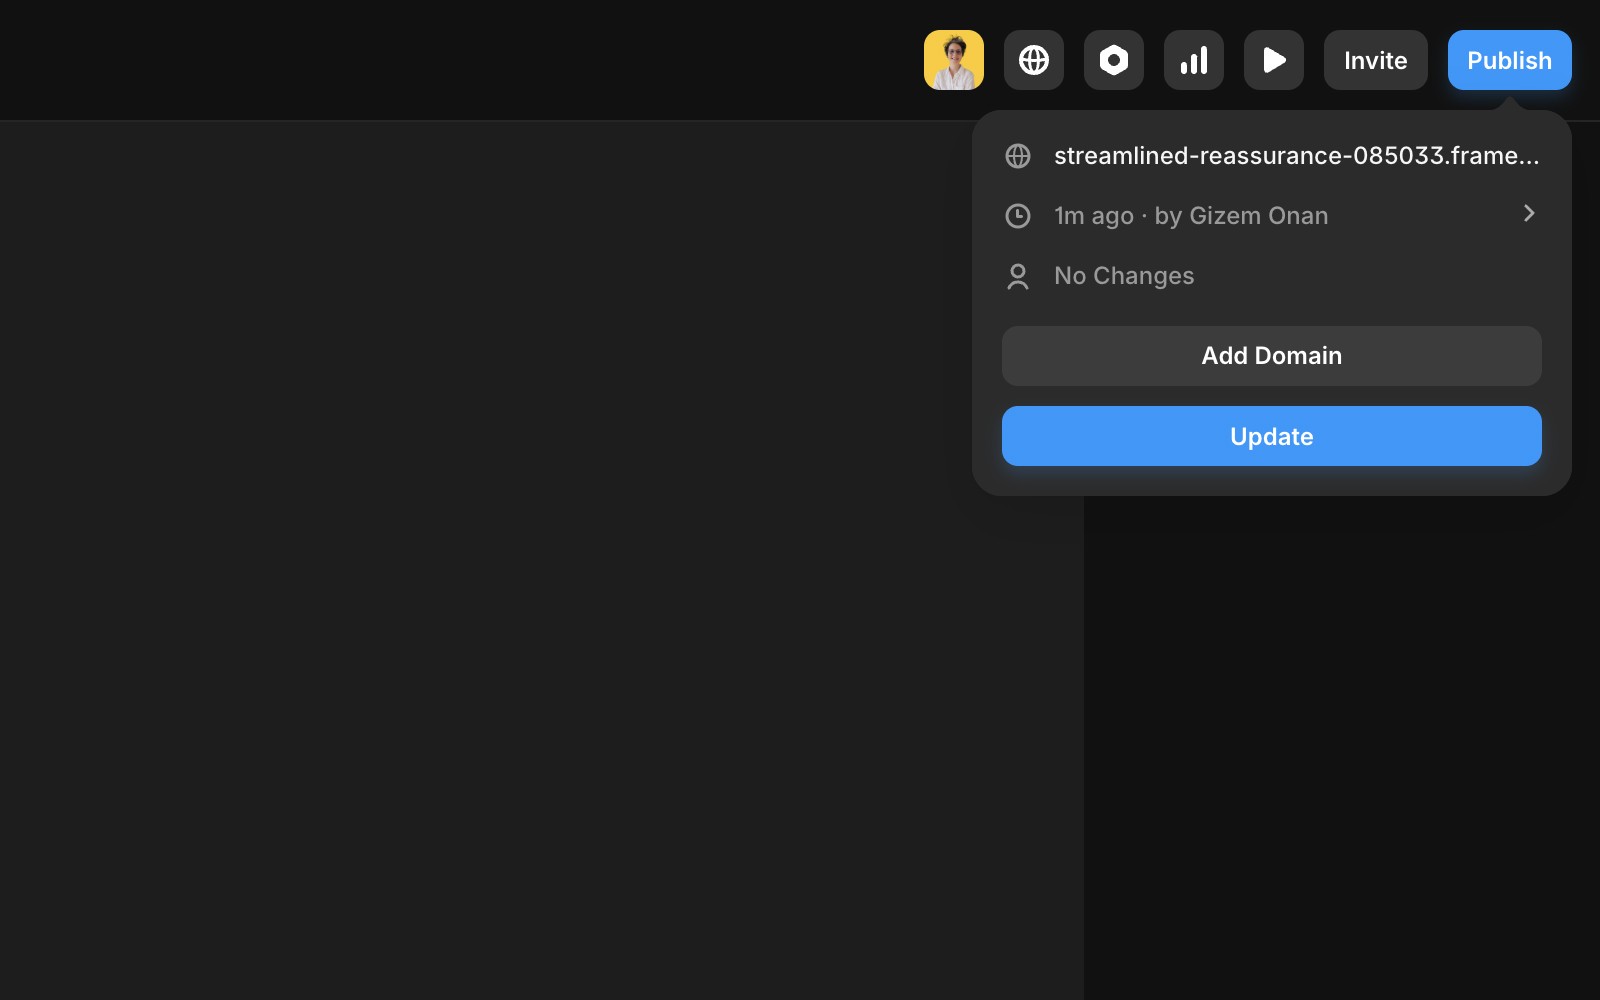
Publish your project
To make your website accessible online, publish your project. Click the “Publish” button in the top-right corner to start hosting your website. After publishing, you can access the URL through the Publish sheet. Use the “Update” button to publish any changes made to your project.
Add a free custom domain
By default, your website is hosted on a Framer subdomain, which cannot be customized. However, you can add a custom domain using one of the following options:
Add a free Framer subdomain.
Connect a third-party domain you own.
Claim a free domain when you purchase a yearly plan.
The first option is free, and Framer automatically configures the DNS settings for you. Your new domain will go live within seconds. Simply enter a substring, choose one of the domain options (framer.website, framer.photos, framer.media, or framer.wiki), and submit.
Claim a free third-party domain
We’ve partnered with Hover to provide a seamless flow where you can select a free or discounted domain that will be automatically connected to your Framer site after purchase. Find your free domain here. To make use of this offer, upgrade your site to a yearly plan, then head over to the Domains section of your project and select the “Claim a free custom domain” option. You will be redirected to Hover to claim your domain and set up your account. After that, the domain will be automatically connected to your Framer site. Please note that it may take some time for DNS changes to propagate and for your site to become available under the new domain.
This offer can be redeemed once per subscription
This offer is available only for sites on a yearly plan
Your domain will automatically renew at the standard rate
Redeeming this offer forfeits the option to request a refund
Your domain and its subscription will be managed through Hover
Add a third party domain you own
To publish your Framer website to a custom domain purchased from a web hosting service, follow these steps:
Purchase a domain from a provider such as Cloudflare or GoDaddy.
Go to the ”Domains” page in your Site Settings and select “Connect a domain you own”.
Enter your domain and update the DNS records provided by Framer in your domain provider’s DNS settings.
Most domain registrars have custom DNS management panels. You can usually find this under Domain Settings and go to DNS Records. Below are guides for common domain registrars:
Gandi: Adding A Records and a CNAME.
Cloudflare: Adding A Records and a CNAME.
Porkbun: Adding A Records and a CNAME.
Configure a domain
To set up a “naked” or “apex” domain (e.g., example.com), configure two A records and one CNAME in your DNS settings with the following values:
A records: Use static IPv4 addresses provided by Framer.
CNAME records: Use for redirecting to the “www” version of your domain.
The required records for your Framer website, that you can also find in the “Domains” tab in your tab of your project settings, are as follow.
Name | Type | Value |
|---|---|---|
@ | A | 31.43.160.6 |
@ | A | 31.43.161.6 |
www | CNAME | sites.framer.app |
Ensure there are no other A or AAAA records configured for the domain, as they may interfere with Framer’s settings.
Configure a subdomain
To set up a subdomain (e.g., subdomain.example.com), create a CNAME record in your DNS settings. Some DNS providers may require a trailing dot (e.g., sites.framer.app.). Enter either the full subdomain or just the subdomain part, depending on your provider.
Name | Type | Value |
|---|---|---|
subdomain.example.com | CNAME | sites.framer.app |
DNS changes may take up to 48 hours to propagate worldwide, though the process is typically faster. Once the domain is connected, your website will be accessible via the new domain.
If you're still experiencing issues, please reach out to us through our contact page for further help.
Discover our Advanced Hosting features Multi Site rewrites and Custom Headers. Those are accessible with a custom domain.
How do I publish my Framer website and make it accessible online?
To make your website accessible online, publish your project by clicking the “Publish” button in the top-right corner. After publishing, you can access the URL through the Publish sheet. Use the “Update” button to publish any changes made to your project.
How can I connect a custom domain to my Framer website?
To connect a custom domain, go to the 'Domains' page in your Site Settings and select 'Connect a domain you own.' Enter your domain and update the DNS records provided by Framer in your domain provider’s DNS settings. For a naked or apex domain (e.g., example.com), configure two A records (31.43.160.6 and 31.43.161.6) and one CNAME (www → sites.framer.app). Ensure there are no other A or AAAA records configured for the domain.
How long does it take for DNS changes to take effect after connecting a custom domain?
DNS changes may take up to 48 hours to propagate worldwide, though the process is typically faster. Once the domain is connected, your website will be accessible via the new domain.
Updated